
Avail Instant Technical Help From My Latest Blog Posts
Subscribe to my blog to get technical troubleshooting help from my blog posts. Fix printer offline, printer attention required, printer setup, hp 9010 setup, fix my hp printer, my hp printer not printing, hp envy 5000 setup
How to Resolve HP Printer Printing Very Slowly?
You are printing with your HP Printer and suddenly felt some sudden slow in the pace, tired every known methods and tired of everything? Then you are at the right place here with us. We will list the possible reason for the hp printer printing slow and the available solutions that could keep you away from the slow printing in the future.
Possible reasons that cause your HP printer to slow down are:
- The damaged or defective ink cartridge or the toner
- The stacked print queue
- The printer is connected to a shared network connection
- Interrupted network availability
- Damaged power and USB cables
- Irrelevant print settings
- Paper and ink out of stock
- Outdated printer driver

Troubleshooting hp printer printing slow issue:
Solutions for Mac users:
Solution 1: Check the quality of the print settings
The shortened fact is the high quality print takes a lot of time to print, as it will take more ink and time as well as. Hence use the high-quality settings only on the needed task. Other time you can use economy mode which takes less ink and saves you more time. To adjust the ink settings, follow the below steps
- Initially click the spotlight shaped icon and enter preview
- Now tap on the file and open option to get the document/photo open
- Next click on the file and click the print option
- This will open up the print job settings
- Next select your printer and tap on the Show details option
- Then open the Print Quality menu
- Next tap on the Media & Quality option
- Then from the drop-down choose Media & Quality or the Paper Type or Quality option
- Now choose Normal or Draft option from the quality or print quality menu
- Make the required changes and apply the changes
Solution 2: Reset your printer
Sometimes a simple reset can help you get over those technical glitches if you have any.
- Initially you have to plug out the power cord while your printer is still turned on
- In case of rechargeable battery printer, remove those printer
- Then wait for few minutes before plugging the power cord back into the printer and the wall outlet
- Finally turn on your printer.
- This will reset your printer to its default print settings
Solution 3: Try turning off the quiet mode
Unfortunately, by reducing the printer sound you are reducing its speed too. So check that also while you need some speed.
- Initially you have to open the printer homepage
- Click on the spotlight icon
- And search forPrinters & Scanners
- Now choose your printer name and select Options & Supplies
- From the following screen select Show Printer Web Page
- In case of HP Smart app, you can select our printer
- And then choose EWS or the printer home page
- In the EWS page, you may asked to enter the admin password or the PIN that has been sent to your printer
- Then from the Setting tab, you can select the Preferences option
- Then choose Quiet mode and choose off, finally click Apply to set the changes
Solutions for Windows users:
Solution 1: Try resetting your printer
- Initially you have to plug out the power cord while your printer is still turned on
- In case of rechargeable battery printer, remove those printer
- Then wait for few minutes before plugging the power cord back into the printer and the wall outlet
- Finally turn on your printer.
- This will reset your printer to its default print settings
Solution 2: Use HP Smart app instead of HP Print Driver
- Initially disconnect any cables connected with your printer
- Then from your windows search for Add or remove programs option
- Now in the following search and choose your printer name
- On finding your printer name, click on the printer and choose Uninstall
- In case if you don’t find your printer name, search and find Printers & scanners
- Then in the following screen select your printer and choose Remove device option
- You have to click yes in the User control message
- Then simply follow the displayed guidelines to successfully remove the printer software
- Now navigate to the HP official site and download the HP Smart app for your device
- Giving the print job through HP Smart app can noticeably improve the printing speed
Solution 3: Try to check and reinstall those ink cartridges
If you don’t have installed the ink cartridges as per the guidelines or if it is not fitted properly in the slot then it can also cause printing issue.
- Initially press the power button to turn on your printer
- Then open the cartridge door of your printer
- Next, wait for the carriage to move and come to a rest state
- Now press cartridge head for it to release from the slot
- While taking them out, don’t touch the copper contacts
- This can cause a permanent damage to them affecting the printing process
- Besides they can also cause clogs, electrical connection failure, and ink flow issue
- Check the cartridges, on seeing any pink tape is still intact, remove them
- After checking the inside, reinsert the ink cartridges and close the cartridge access door
Along with these above steps follow the steps to turn off the quiet mode in your windows system.
Read more:

Why My HP Printer Assistant Not Working?
HP printer assistant is a piece of software that helps in managing HP printer driver installation with the windows system. Further the HP assistant gives assistance for users with scanning, checking ink levels, order supplies and more. Some users may sometimes experience HP Printer Assistant Not Working issues. This may occur due to any of the underlying technical glitches.

For assisting those users, in this article we will cover the end-to-end steps in providing a deeper insight on the reasons and solutions for HP Printer Assistant Not Working issue.
Troubleshooting HP Printer Assistant Not Working issue
Initially you have to make sure that the HP printer assistant is installed in your system. Find and double-click on the printer icon on your desktop. If you don’t have the shortcut, from windows search your printer model and choose your printer model. In the following screens you may find the printer assistant. If you don’t find the printer assistant, then you can download the latest version from the HP official site.
Uninstall the existing HP printer driver
Before starting with uninstallation, make sure the USB cable is disconnected from your printer and the system. Then open the control panel and select Programs and features option. Then from the following choose HP printer software. Then right-click to uninstall the program. Once done uninstalling restart the computer to proceed with the next step.
Reinstall the latest HP printer driver
Initially make sure no cable is connected with your printer. You can connect the cable when needed. Then from your system navigate to the HP printer home page. And choose software and driver downloads. In the “Let's identify your product to get started” page, enter the printer model number and click submit. Finally under the driver tab tap on the Download option.
Reconnect the printer
Tap on the printer icon to open the printer setup screen. Then click on the “connect a new printer” option. Simply follow the onscreen instruction to complete the reconnection process. Once finished try opening the HP Printer Assistant if it gets opened the problem solved if not you can try further steps.
Restart the devices connected with your printer and the printer
Restarting any electrical device can sometime help you with the problem. We advise you the same with this issue. Try to restart your router, system and printer.
Disable the antivirus
Sometimes the antivirus may assume the HP printer and its software as a threat to the system. The antivirus will in turn block all its communication with the windows. Hence, the user may try to uninstall the anti-virus or make proper adjustments to continue with the HP printer assistant.
We hope this article would help you assist in solving your existing issue and help you continue with your printing job. For more information on queries and doubts on HP Printer Assistant, please contact the HP customer support executives for professional assistance and smart solutions tailor-made for every user situation.
Frequently Asked Questions
- what if my hp printer is not found or the connection fails during usb setup
- how to use the hp printer functions with the windows built-in driver
- how can I change the printer settings if using a built-in driver
- what if the hp printer cannot connect to the network
- what if my hp printer is not found or the wired network connection fails

How to Scan with an HP Printer on Windows & Mac?
Do you want to scan any document or photo from your windows or Mac computer? Then this article is for you. We have consolidated every possible method to scan any document or photo from HP printer. Read along to know more.

Steps for how to scan from HP printer to windows and mac
For scanning from windows, there are three methods available. They are:
HP smart app
- Initially place the document inside the scanner glass or in the ADF if you have more document to scan
- Then open the HP Smart app from your computer
- Click on the scan tile
- Choose your printer name
- In the following screen, do the needful settings
- Then click the scan button at the bottom of the screen
- Check the preview screen, do the needful edits and click done
- Once scanned, you can choose to print, share or fax
Windows Fax and Scan software
- First place the document in the printer
- Then from your system, search and choose Windows Fax and Scan
- In the following screen, tap on in the New scan from top-left corner
- Choose your printer name and click Ok
- Do the needful changes in the following settings screen
- Finally click the scan button
Windows Devices and Printers software
- Place the document in the scanner glass or the ADF
- Then from your system, search and choose Windows Devices and Printers
- In the following screen, choose your printer name
- Right-click on your printer name and select start scan option
- Do the needful changes in the following settings screen
- Click preview
- Then click scan
- One scanned you can choose to print, fax or share the scanned document
HP Smart to scan your document from the HP printer in MacOS
- Initially install the HP smart app in your Mac system
- Make sure to setup your printer in the application
- From your printer, load the required paper and document inside the scanner glass
- You can use the guide rails to place the paper properly inside the printer
- In case of having multiple documents, use ADF (Automatic Document Feeder)
- Once you load the paper, open HP smart app
- If there is multiple printer connected to the application, choose your printer name
- Then click the scan tile from the bottom of the screen
- In the following screen, adjust the settings as per your desire
- Now click scan
You can preview the scan to add more pages or reorder the existing pages. Further, you can edit the file name and scan. In the following page do the needed editing and click Done. Again check the altered settings in the preview screen. Once scanning got finished from the Mac system to the HP printer, you can print, save, or share the scanned documents.
Read more:
- How to scan from hp printer to android phone, iphone & ipad
- How to scan from hp printer to chromebook devices
Frequently asked questions

How to Improve the Quality of Faxes on HP Printers?
Having issues with quality of fax? There are simple steps and adjustments you can make to the settings of fax in the sending and the receiving fax machines to receive a perfect quality fax.

Simple steps to improve fax quality on HP printer
Start with cleaning the physical parts
Initially it’s better to look and eliminate any physical hindrances seen with the printer parts. For that turn off your printer and remove all the connected cords. Open the scanner lid and use lint-free, soft cloth to clean the surface. You can use a distilled water spray to wipe off any dust/debris sediment on the scanner surface.
Then go with software elements
Make sure you are using the updated and latest version of the printer driver software. Navigate to the HP official home page and tap on the HP Software and Driver Downloads where you can check and download the recent firmware updates if available.
Now adjust few technical specifications
Try reducing the fax transmission speed that can probably improve the fax quality on hp printer. For that, from the printer control panel, tap on the Basic Fax Settings followed by Advanced Fax Settings. Then choose speed and select slow.
Set auto retransmission for improved quality
Turning on the Error Correction Mode (ECM) assists in auto detection of unacceptable quality and requests another copy. To turn on ECM, from your printer control panel, tap on the Basic Fax Settings, then Advanced Fax Setting. From the following page, choose Error Correction Mode. Finally make sure the ECM is turned on.
Reset and service the printer
While your printer is still turned on, remover the power cables from the printer. Wait for a minute before turning on your printer. This process will reset your hp printer. If none of the above steps helps you improve fax quality on hp printer, you can contact hp customer support who can give appropriate advice on the ongoing issue.
Document format and design properties for high quality fax
Always look for the document format, properties and the design elements like font size, colors and brightness before starting the fax sending/receiving process to improve fax quality on hp printer.
- The Standard quality for portrait layout should be 1728 pixels wide and 1100 pixels vertically for standard quality
- For High quality the resolution must range from 1728 pixels wide and 2200 pixels vertically.
- Make sure the fonts are in pure black on a pure white background
- Always prefer sans-serif over Arial fonts. Also you can choose much softer and rounded fonts like Calibri or Verdana on a scale of 10
- Keep in mind black or grey images render with high quality on comparing with the color images
Troubleshooting fax machine to work with HP printer
We will consolidate few of the quick steps that you can perform, if you face any faxing issue on HP printer.
- Initially check your phone line
- Call the fax number to check if the receiving end is working without any issues
- Try removing any other devices connected to the fax line
- Always use the fax cord shipped along with the printer
- Before faxing check your physical fax setup.
We hope this article helps you find the faxing issue and provides you with instruction on improving the fax quality.
Frequently Asked Questions
- Why does my hp envy 7155 printer keeps saying out of paper
- My hp officejet 4632 printer showing ink cartridge problem
- HP envy 7800 not printing clearly- how to fix it
- How can i fix error code 0xc10a0023 on hp officejet pro 8610 printers
- Why hp officejet 3830 printer not printing black ink properly
- Why is my hp officejet pro 9025 not connecting to the new wifi device
- My hp printer keeps on saying jamming error- how to solve
- Attention required notification blocked printing- how to fix it

How to Print with Wi-Fi Direct on Windows or Mac?
Connect your Wi-Fi devices to the HP printer without traditional home, office or public Wi-Fi network with the Wi-Fi Direct features of the HP printer. Thinking how? Ease up and follow the below article for deep insight on the printing process of HP printer with Wi-Fi Direct on Windows and Mac.

- Connect anywhere anytime with Wi-Fi Direct
- Connect & Print anywhere anytime with Wi-Fi Direct feature of HP printer
Print with HP Wi-Fi Direct on Windows
- Initially turn on your HP printer
- Then from the printer control panel, press the Wi-Fi Direct icon
- In the following Wi-Fi Direct details screen note down the Wi-Fi direct name and its password
- Further, at the end of the page there is a settings icon
- In the following Wi-Fi Direct settings screen turn on the Wi-Fi Direct
- The connection method will be automatic
- The connection method can be altered from automatic or manual based on the preference
- Navigate to your windows system
- Tap on the start button and choose settings
- Open the network and internet option
- In the following screen select show available networks option
- Select the printers name that start with Direct in front of it
- Tap on the connect button below the network name
- Don’t enter the router pin
- Enter the Wi-Fi Direct password and click the Next button
Navigate to the settings menu of the system and tap on the Devices. Choose printers and scanners option. Now choose add a printers & scanners option. In the following list choose the printer with Direct in front of its name. In the next screen click on the manage button. Open a document; go to file and start printing as usual. Once done you can connect to your home or the office network.
Print with HP Wi-Fi Direct on Mac
Follow the below steps to print from their Mac to a HP printer using Wi-Fi Direct
- Initially turn on your HP printer and note down the Wi-Fi Direct name of your printer
- Press the Wi-Fi Direct icon and open the settings menu
- From the following page note down the Wi-Fi Direct name and the password
- Now tap on the Wi-Fi icon and choose the Wi-Fi Direct printer name
- In the following pop-up window enter the Wi-Fi Direct network password that you have noted from your printer
- Then click Next
- Now from your computer open the document that you want to print
- Tap on the file menu and choose print
- once the job gets completed, you can reconnect your printer to the original Wi-Fi network
We hope that this article has been an eye opener regarding the long existing dilemmas, doubts and queries regarding the Wi-Fi Direct setup of HP printer with Mac and windows OS.
Read more:
How to Print with HP Printer WiFi Direct on Android Devices
How to Print with HP Printer WiFi Direct on iOS and iPadOS Devices
Print with HP Printer WiFi Direct on Chromebook Devices
Frequently Asked Questions
How Can I Change the WiFi Direct Password and Other Settings
Access HP Printer Settings & Management Tools with WiFi Direct Network
How Can I Find the WPS PIN for HP Printer Setup
What to Do When a Print Job or Wi-Fi Direct Connection Fails

Why My HP Printer Printing Random Characters?
If you think your HP printer has gone crazy or HP printer printing gibberish text or weird symbols then this article is for you. It is not a ghost event but a technical glitch that can be solved with proper assistance.
Solutions for solving HP printer printing gibberish text issue
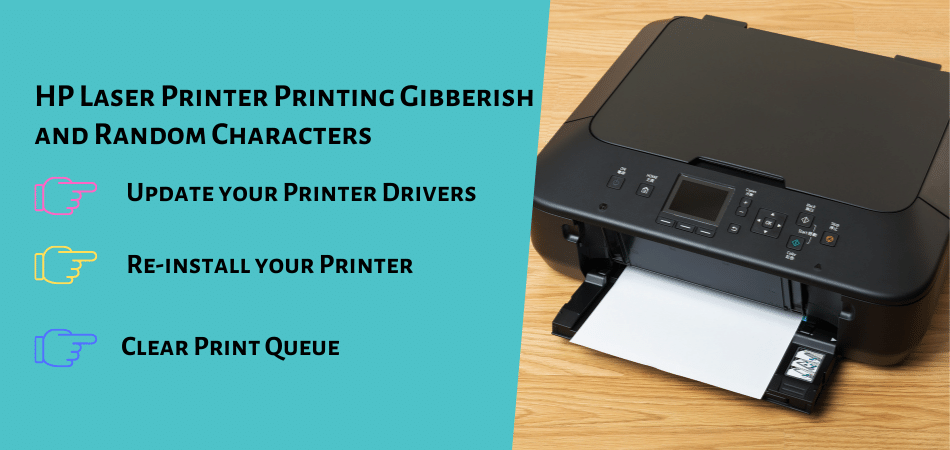
Solution-1 Download HP print and scan doctor
Find the HP print and scan doctor application specifically designed for any HP printer. Downloading and installing them in your system can automatically help you find and solve the existing issue.
Solution-2 Look for the HP printer cartridges
Next thing is to check those cartridges. Always use genuine HP cartridges. Open the front door and take the cartridges out. Look for any tear, leaks and broken pieces. On any damage replace them with new one. If not clean the drum and cartridges before placing them back into its position.
Solution-3 Change the HP printer connection and position
- Remove any surge protector or any connector for the printer
- Connect the printer directly to the wall outlet
- Don’t place the printer ear air conditioner, highly humid or dry place
- Check the cables for any damages and cuts
- Make sure the USB cable is connected firmly inside the printer and the wall outlet
- Also try replacing the USB cable and the wall outlet
Solution-4 Reset the HP printer
Make sure that your printer is turned on. Then press and hold the power button for few seconds. Now reconnect the power cord back to the printer.
Solution-5 Stop and remove any print job
- Tap on the start button on the windows computer
- Then choose control panel
- Select Hardware and Sound
- Choose View Devices and printers option
- Then tap on the printer icon and choose See What's Printing option
- In the following page you can choose the ongoing print jobs and click cancel
- Choose ok to confirm the process
Solution-6 Check the printer default settings
- Tap on the start button on the windows computer
- Then choose control panel
- Select Devices and printers option
- In the following page search for your printer name
- If the printer has a tick mark near it, then your printer is set as a default one
- If not, right-click on the printer and choose Set as Default Printer option
Solution-7 Analyze the network configuration page
- Initially navigate to the HP printer home page
- Enter you printer model number along with the name in the Find my product and get support search box
- Then enter Network Configuration Page in the keyword search box
- Now tap on the enter button
- You can analyze the Network Configuration Page for weird text
We hope this article has helped you solve your weird, crazy and gibberish text printing issue.
Frequently asked questions

Why HP Printer Web Services Not Working Properly?
The printer not getting connected may not always a simple issue. The user has to check some potential solution apart from resetting printer and other simple steps. In this article we will share some of the potential reasons along with the solutions to solve your HP printer cannot connect to web services issue.

Turn on web services
Before proceeding with the troubleshooting steps, let us turn on the web service for your HP printer since a proper turning on of the web service can solve many of our issues.
- Initially make sure that your printer is connected with an active internet connection on a wired or wireless network.
- For wired connection, make sure the green link light is steady and the orange light is blinking.
- In case of wireless network, the wireless feature is on and the blue light is steady without blinking.
- Next from your printer control panel, press the HP ePrint icon.
- Then choose the Wireless settings.
- In the following web services menu, if you see a summary screen then the web services are on.
- If you are prompted to turn on the web service then follow the onscreen instructions to turn it on.
Troubleshooting error messages received during turning on web services
Follow the below steps to solve HP printer cannot connect to web services issue.
- Initially restart your printer, router, and the system connected to the printer.
- Then make sure the printer is connected to an active internet connection through a wired or wireless setup.
- For a wired connection the steady internet connection can be identified by the blinking orange light and steady green light.
- For a wireless connection the blue light of the printer must be steady.
- Next make sure the printer and router are in proximity no closer than 6 feet.
- Then check and make sure that your router has operating bandwidth of 4GHz.
- Then remove any device that emit electromagnetic signal which may distract the Wi-Fi signals.
- Next check the proxy settings.
- Also updating the printer firmware can also solve HP printer cannot connect to web services.
- Keep in mind the outdated router firmware can also cause security, performance and connectivity issue.
- So make sure to update the router firmware.
- Then try restoring the factory defaults, for that follow the below steps.
- From the printer control panel tap on the setup icon.
- Then choose printer maintenance.
- Tap on restore button.
- Next choose restore factory defaults.
- Now click continue to finish the factory default restoration process.
We hope that this article on HP printer cannot connect to web services has helped you resolve your issues and get back your printer on a working condition. In case of further queries and doubts on HP web services not working issue then read our other effective HP printer solutions.
Read more:

How to Print Both Sides of the Paper with HP Printers?
Looking at ways how to print both sides of the paper with an HP Printer, then this article is for you. Read below to know the steps for printing on both sides of the printer on windows and mac.
Before starting with printing on both sides let’s find out that your printer has these capabilities. For that follow the below steps.
- From your system, open the document that you want to print
- Tap on the file tab
- Choose Print option
- Then in the settings, check the options
- If it has a print on both sides option then your printer has a duplex printing feature available
How to print both sides of the paper with an HP Printer
First, you have to prepare your duplex printing setup. For that, load enough paper in your printer based on the previously initialized setup. Make sure that you are having enough ink in your printer cartridges.
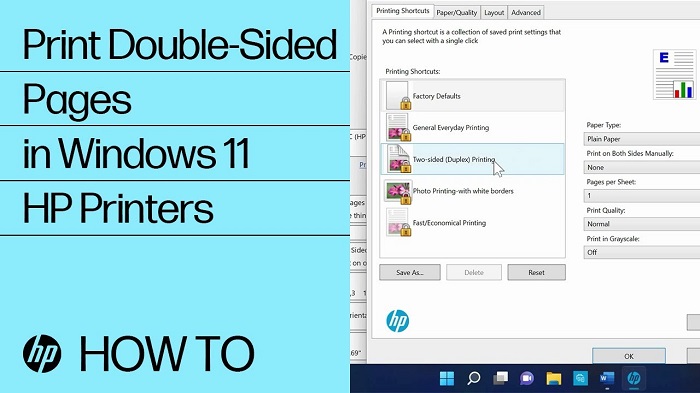
Steps to print both sides of the paper with an HP Printer on windows
- Open the document that needs to be printed
- Then tap on the Print option on the File menu
- Now choose printer properties and select Preferences
- In the following Properties window choose the page layout
- Choose booklet or tablet layout
- For HP printer with Layout menu
- Click on the Finishing tab, and choose to bind. Then in the flip option, you can select Print on Both Sides Manually or Print on Both Sides option.
- For HP printer with printing shortcut menu
- Now click ok
- Then click Print
- If it doesn’t print automatically remove and load the paper
- Tap on the continue to start printing on the other side
- Once completed remove the check mark on Print on Both Sides for the normal printing process
Steps to print both sides of the paper with an HP Printer on mac devices
For printing, both sides on the Mac OS, follow the same general procedure up to paper loading in windows. Then
- Tap on the File Print and choose the Show Details option
- If the two-sided settings are available
- You can choose Layout. For the Booklet model, select Long-Edge binding and for Short-Edge binding perfect for Tablet layout, select the two-Sided option. Finally, Click Print.
- If the two-sided settings are available
- For the printing options menu without a name
- You can choose Paper Handing. Then from the Pages to Print menu, select the Odd Only option.
- Now select the page order menu from the Reverse and Automatic option
- Finally, click Print
Printing on both sides of paper called duplex printing can make most of your time-consumable job easy. We hope this article has assisted you with the duplex printing with HP printer on windows and mac. For more information and related queries with HP printing, please contact HP customer support executives for a personalized solution.
Frequently Asked Questions
- How can i connect my newly bought printer to wi-fi
- How can i fix my hp envy 4520 not printing black ink properly
- My hp officejet pro 8710 printer showing offline- need help
- What to do if my hp printer alignment keeps failing
- My hp envy 5540 keeps saying out of paper- what to do
- How to setup wireless printer hp officejet pro 8600
- How do i fix the attention required on my hp printer
- How to connect hp envy 4500 printer to wifi
- Why does my hp printer keep going offline
- Why is my hp deskjet 3520 not printing black ink

How to Fix Brother Printer Paper Jam Error?
Are you in a hurry printing out some specifics that need to be submitted on time and your Brother printer got jammed? In this article, we will list you the possible chances for the Brother Printer jam along with the solutions that may keep you safe from the Brother printer paper jam error.
Possible reasons for Printer Paper Jam Error
Check the below general instructions to see if you can solve your paper jam error with Brother Printer
- Paper standards
- Command repetition
- Check for any alien objects
- Greased paper pick-up rollers
- Outdated printer driver
- Hardware issues
If these don’t help you solve the Brother Printer keeps jamming issue, you can follow the below-mentioned quick solutions to get your printer back in its original track of printing.
Quick solutions to fix Brother Printer Paper Jam Error

Brother printer users often experience the Paper Jam Error issue even after the jammed paper has removed from the printer. In that case, follow the below steps to clear the paper jam issue from the printer display.
Check the below printer parts to identify and eliminate the Brother Printer Paper Jam Error.
- Drum unit and toner cartridge
Turn off your printer and open the front cover. Leave the printer untouched for few minutes to hour since the surface remains hot. Now carefully take the drum unit and toner cartridge. Put them on a safe place. After that check if there is any jammed paper and close the front door.
- Paper tray
Next open the paper tray and see if there is any jammed paper. If so use both hands to gently pull that out from the printer.
- Back cover
Now open the back cover. Use a torch light to examine the area for any jammed paper.
- Fuser unit
Gently open the fuser tabs to open the fuser unit. If you find any jammed paper, use both hands to gently pull that out from the printer.
- Duplex tray
Pull out the duplex tray out of the machine and see if there is any jammed paper. If so use both hands to gently pull that out from the printer.
- Toner cartridges
Use the green lock lever to take the toner cartridge out from the drum unit. Once you have taken out the toner check the inside for any jammed papers and bits. Then put back the toner inside the drum unit and drum unit back into its place.
After putting back everything in its place, close the printer front cover. Check if the Ready led is on with error led lights off. You can try printing any document to check whether the Brother Printer keeps jamming issue has resolved or not.
Frequently asked questions
- How to Clear Brother Printer Paper Jam from Tray 1?
- How to Remove Unwanted Papers Inside the Brother Printers?
- How to Fix Paper Jam Rear Side of the Brother Printers?
Read More:

How Can I Setup My Brother Printer for Wireless Printing?
Looking for instructions for Brother printer wireless setup with your wifi network? Then read along for end-to-end assistance with this article.

General instruction for Brother wireless setup
Before starting with the Brother Printer wireless setup, you have to collect and made some prior arrangements for a seamless wireless connection setup. First, make a note of the network name (SSID). Then the network key (password). Find them on the side description of the access point or the router. If you can’t find it there, check the documentation that came along with the router.
- Initially take your power cord and connect it with the wall socket and Brother Printer
- Now turn on your printer
- Then press the menu button from the printer control panel
- Use the navigation button to choose the Network option and click ok
- In the following page use the navigation button to choose the WLAN option and click ok
- Again use the navigation button to choose the Setup Wizard option and click ok
- In the upcoming WLAN Enable? The message, choose Yes
This will enable the wireless network and start the wireless setup wizard. Now you can see that your Brother printer begins to search for networks and lists the available network. Choose your network and press ok. If the process is complete you can get a connected message. If not the machine will print a wireless connection report. Check the error code and troubleshoot the issue.
Quick steps for Brother device wireless setup with WPS method
For WPS (Wi-Fi Protected Setup), you have to make sure that your Wi-Fi access point/router contains a WPS symbol indicating that it supports the WPS method. Then know the Wi-Fi access point/router Wi-Fi signal range and place your printer within the range.
- Initially press the WPS button on the Wi-Fi access point/router
- Then press and hold the Wi-Fi button on the printer for about 5 seconds
- You can see the blinking Wi-Fi indicator with blue light turning into steady blue light
This indicates the establishment of wireless access between the printer and the devices (computer/mobile) connected to the same network.
Read more:
Brother printer offline windows 10

How to Solve Error Code 79 on HP Laserjet Printers?
Laserjet Pro customers may see the HP service error 79 on the printer's control panel. There are two types of this mistake.
The first is Error 79. This is caused by out-of-date firmware or software drivers.
79 Service Error is the second. It happens when an incompatible DIMM is installed.
Follow the top two methods outlined below to quickly and simply resolve this issue.

Solution-I 79 Error Turn off then on
- Switch off your printer, wait 30 seconds, then turn it back on and wait for it to initialize.
- Remove the extension board if you're using one. Connect the printer to the electrical socket immediately and turn it on.
- If the error warning persists. Disconnect any network or USB cords after that.
- Examine your printer's firmware version and, if necessary, update it to a newer one.
- NOTE: You may verify the firmware version on your printer by printing the configuration report from the control panel.
- If the issue persists, you must erase all print jobs from all computers that are linked to the printer.
Solution-II 79 Service error Turn off then on
- Switch off your printer, wait 30 seconds, then turn it back on and wait for it to initialize.
- Remove the extension board if you're using one. Connect the printer to the electrical socket immediately and turn it on.
- If the problem notice error persists, Disconnect any network or USB cords after that.
- Examine your printer's firmware version and, if necessary, update it to a newer one.
- NOTE: You may verify the firmware version on your printer by printing the configuration report from the control panel.
- If the situation persists, the installed DIMMs must be removed and placed in isolation.
- Try printing any document now. If it prints fine, you need to install the DIMM supported by your printer device.
Read More:
Why is my hp envy 4500 printer offline
Why does my hp printer keep saying out of paper
How do I fix the alignment on my hp printer
How to connect my hp envy pro 6455 printer to wifi
What does it mean when my hp printer says attention required

How to Install New HP Officejet Pro 9015 Series Printer?
The first-time setup- installation for HP Officejet Pro 9015 series printers is covered here. This document applies to the HP Officejet Pro 9010, 9015, 9018, 9020, and 9025 all-in-one printer family.
Step-1 Remove the packaging materials from your printer and unbox it.
To begin, open the printer's box. Then take out the user guide and the ink cartridges that come with it. Remove the printer device from the packaging box now. Next, Remove the foam from both sides of the printer and set aside the power wire. Now take the printer out of the plastic bag. Remove all of the taps from the front of the printer as well as the control panel window. Now Close the scanner lid after removing the foam-based layer by lifting the cover.
Step-2 Make the necessary cable connections and preferences.
To begin, connect one end of the power line to the printer's back and the other end to a wall outlet. Your printer will now start (turn ON) on its own. Then, from the printer control panel, pick your desired language and confirm. After that, you must choose your nation and then confirm your selection.
Step-3 Ink cartridges are installed.
To begin, open your printer's front door and lift the cartridge access door. Remove the plastic insert when the carriage is idle or quiet. Now remove the cartridges from the packaging and unroll them. Next, pull the tab from the plastic tab on the black cartridge to reveal the vent slot. Hold the cartridge by its sides and twist the cap to remove it; you may need to use a lot of force. To avoid clogs, ink failure, and improper electrical connections, do not touch the ink port or metal contacts. Match the letter and colour of the cartridge to the carriage's matching slot. After that, slip the cartridge into the slot while holding it by its sides.
Step-4 Place a stack of papers in the input tray.
The primary paper tray must first be slid out. Remove the cardboard constraint and tape after that. Place the paper guidelines at the top of the stack. After then, fill the stack with regular A4 paper. Make sure the paper stack is pushed all the way into the tray. Now adjust the paper guides so that they are in contact with the stack of papers. If a notice appears on the control panel screen, slide in the paper tray and then tap OK.
Step-5 An alignment page should be printed and scanned.
Firstly, remove the output tray by sliding it out. An alignment page will now print on its own. Before you start printing papers, make sure you scan the alignment page. So, open the scanner lid and set the paper on the scanner glass, print side down. For optimal positioning, please refer to the scan instructions. Now close the scanner lid and then press the Scan button. When the message "Alignment Successful" shows on the screen, press OK to finish the hardware setup or installation.
Read More:
Installation of HP Officejet Pro 8710-8720 series first-time printer setup
HP Officejet Pro 8600, 8610 series installation first-time printer setup
Installation of HP Officejet Pro 8020-8030 series first-time printer setup
HP Officejet Pro 6968-6978 series installation first-time printer setup

How to Sort HP Printer Not Printing Black Ink Properly?
Your HP printer may work properly some of the time but will not output black ink. If your HP printer not printing black ink correctly, here's what you should do.

There are a number of reasons for this problem. The following are a few of them: -
- Using non-genuine ink cartridges.
- Printheads that have become clogged.
- Ink cartridges that are defective or empty.
- Paper settings that aren't quite right.
- The driver is out of date.
Next, we'll look at five different ways to remedy your black ink issues. To address the problem, please follow the steps below.
Solution 1: Use an automated instrument to clean the printhead.
- If your printer isn't printing black or is printing a light grey hue, it's time to replace it. Then take a look at the automated printhead cleaning option. To run the automated printhead cleaning, follow the step-by-step instructions.
- To begin, place the paper in the input tray.
- Then, in the lower-left corner of the control panel, press the (-) button next to the setup icon.
- To pick tools, use the right arrow key and then OK.
- Select the clean printhead with the right arrow key button once more, and then tap on OK. The printer will now begin the cleaning procedure.
- Note: The mechanical noises that occur throughout the cleanup procedure are typical. Your printer will print a test page after you've completed the cleanup.
- On the printhead test page, you must now check the print quality. If your HP printer isn't producing black color correctly, here's what you should do. Then, in order to complete the second phase of the cleaning process, you must follow the instructions. To restore optimal print quality, you may need to clean the printhead several times.
- Note: To avoid any issues that require cleaning, you must always turn off your printer.
Solution 2: Align your HP printer with your computer.
- Make sure your printer is turned on and that the paper stack is in the tray.
- Then, in the lower-left corner of the control panel, press the (-) button next to the setup icon.
- To pick tools, use the right arrow key and then OK.
- Select the align printer with the right arrow key button once again, and then tap OK.
- An alignment page will now be printed by your printer.
- Remove the printer's cover.
- The alignment page must then be placed on the right front corner of the scanner glass. Ascertain that the printed side of the page is facing down.
- Furthermore, you can see the alignment page loading guide next to the scanner glass.
- To finish the alignment process, close the lid and hit OK.
- You must wait for the printer to scan the alignment page and finish the alignment operation.
- Try printing a test page now. If you're still having trouble, why isn't my HP printer printing black ink? Then go to the next step in resolving the issue.
Solution-3 Check the ink level in the black color cartridge
- To begin, place the stack of papers in the input tray.
- Then, in the lower-left corner of the control panel, press the (-) button next to the setup icon.
- To pick tools, use the right arrow key and then OK.
- If none of the cartridges are running low on ink, continue. There is no need to replace any of them. Go to the second solution now.
- If your black or other cartridges are running low on ink, replace them.
Read More:-
how can I connect my newly bought printer to Wi-Fi
How can I fix my HP Envy 4520 not printing black ink properly
my hp officejet pro 8710 printer showing offline need help
what to do my hp printer alignment keeps failing
my hp envy 5540 keeps saying out of paper what to do
how to setup wireless printer hp officejet pro 8600
how do i fix the attention required on my hp printer
how to connect hp envy 4500 printer to wifi

How to do wireless printer setup with HP Smart app
Through this blog, you will learn how to connect your printer to wifi with the help of the HP smart app.
Note: Almost all the wireless printers manufactured in the year 2010 and later are compatible with HP smart app.
Download, install and run the HP Smart app
- Firstly download the HP Smart app for Windows or Mac platform from their respective online store.
- You need to create a new HP account to reach all printer services if using it first time on your device.
- Otherwise, you can sign in with your HP login details.
- Make sure your Mac or Windows 10 based computer or laptop and Android, iOS, iPadOS based smartphone, or tablet connect to your local wifi network.
- Ensure the strong strength of network signals for the setup process.
- You need to place the printer near the Wi-Fi router during the setup process.
- Now turn ON your HP printer.
- Next, you need to open the HP Smart app and click on the plus (+) sign to add your printer to wifi.
- Now click on the HP printer setup button on the HP smart app.
- Next, it will ask you to enter the Wi-Fi password of your router that is the WEP or WPA key.
- Now HP smart app will begin the connection process between the printer and the local wifi network.
- Next, you are suggested to follow the on-screen instructions to complete the setup process.
- Finally, click on the exit button when your hp printer is connected to the wifi.
Read more troubleshooting guides for:

How to Stop Printing Jobs on HP Printers?
Sometimes we unjustly send two print jobs from our HP printer. So, learn how to stop printing jobs on HP printers for Windows 10, 8, 7 Computer, Mac, iPhone, iPad quickly. The print jobs cancellation helps us to save money, time, and paper.
Top Solutions for How to Cancel a Print Job on HP Printer & Windows 10
1] Cancel Print Job from Printer's Control Panel
- If you are utilizing a Printer with buttons, then you require to press the Cancel button.
- If you are practicing a Printer with a Touchscreen panel, then you need to touch on 'X', Stop, or Cancel.

[2] Cancel Print Job on HP Printer via Android Phone
NOTE: Constantly discover that you are simply worthy of canceling print jobs from your android mobile device which you used to send print jobs.
- On your Android Phone, there are two options HP eprint application and HP Print Service Plugin to cancel a print job from the print queue.
- If you are practicing the HP eprint application for printing, then proceed to its home screen.
- Following this, you require to succeed on the notification icon from the eprint application.
- Immediately touch on the "X" button and then tap on Yes.
- The current printing job will stop immediately.
- If you are using HP Print Service plugin for printing documents, then you necessitate to swipe down the screen to view the current notifications.
- Now you require to select the print job from the queue which you need to cancel.
- Touch on the Cancel button to cancel the print job.
[3] How to Cancel a Print Job on Windows 10
Learn how to cancel the print queue in Windows 10 device.
NOTE: Always remember that you can just cancel the print job from the computer that you practiced to send the print command.
- At first, open the print queue.
- See the printer icon near the notification section of the Taskbar menu.
- Now click on the printer icon to open the print queue.
- If you are incapable to locate the printer icon in the taskbar notification area, then press the Windows key and seek for Printers.
- Following this, you require to choose your HP printer from the record of printers and then click on Open Queue.
Next right click on the particular print job you desire to cancel on windows 10, then succeed on Cancel.
[4] How to Cancel print job on HP Printer via Apple iPhone or iPad
Learn how you can cancel the print job from the print queue on an iPhone or iPad.
- At first, you require to open the App Switcher.
- If your mobile gadget has a home button, then snap on the home button twice.
- If your device does not support the home key, then you are deemed to swipe up from the bottom of the screen.
- Now swipe the left side and later tap on the Print Center app.
- Now click on the particular print job that you want to cancel, then tap on Cancel Printing.
[5] How to Cancel Print Job from Print Queue on Mac OS or OS X
- Firstly, discover the printer icon on the dock.
- Next, you require to click on the printer icon by choosing the print jobs.
- A record of print jobs will display from the print queue.
- Promptly you necessitate deciding which job you desire to stop. So take the one and click on the Cancel button icon alongside the print job.
- In conclusion, the wanted print job will be canceled.
- If you are helpless to find the printer icon on the dock, then proceed to the "System Preferences".
- Following this, you require to hit on the Print and Scan icon.
- Promptly again you have to choose your HP printer from the menu, then click on the key "Open Print Queue".
- From the list of the print queue, you require to click on the Cancel key next to the print job.
Above all solutions are to cancel the print jobs from the print queue. If you want to cancel stuck or pending print jobs in the print queue, then avail of the expert's assistance.
Read More:
Can I Fix HP Envy 4500 Cartridge Error
Guide for HP Officejet Pro 8710-8720 All-in-One Printer Troubleshooting
How to Solve HP 8610 Error Code 0xc19a0003
How to do HP Envy 4520-4527 All-in-One Printer Troubleshooting

HP Printer Alignment Failed Error- How to Resolve?
Whenever we install or align new ink cartridges or printheads for the printer, an HP Printer Alignment Failed error may occur. Furthermore, “printer alignment unsuccessful” errors might occur due to the improper installation of cartridges or printheads.
Best Methods to Solve HP Printer Alignment Unsuccessful Error Message
Fix-1 Reset HP Printer
Turn OFF and then, ON the HP printer might resolve the Printer alignment failed error message.
- Ensure that printer is turned ON at first.
- Next, you are assumed to remove the power cable from the rear end of the printer.
- Furthermore, eject the power cord from the power source.
- Now, wait for at least 1 minute.
- Make connections between the power cable to the wall outlet and the printer.
NOTE: We suggest connecting the printer directly to the power source.
If resetting the HP Printer inadequate to solve the problem, then proceed to the next action.
Fix-2 Clean HP Printer Ink Cartridge and Printhead Manually
If the HP Printer device is inefficient to print black or color ink or print blank pages, it means printer alignment failed occurred. Here we are sharing the actions to clean the printhead manually to fix the problem.
- Firstly, you require a glass container, a rough cloth, distilled lukewarm water, and paper napkins.
- Wet paper napkins in the glass container and drain lukewarm water till it is two inches deep, as the paper napkins have to be fully swamped.
- Promptly eliminate all the ink cartridges from the printhead by pressing the tab button to free it.
- You advised installing the ink cartridges on the soaked paper napkins. Assure that the cartridges do not open outside for more than 30 minutes.
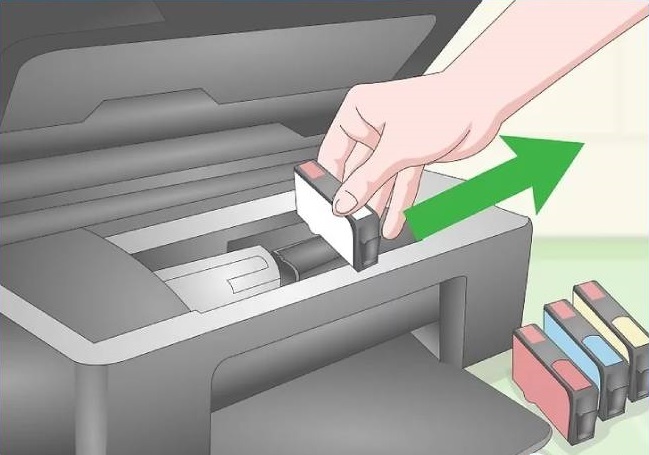
- Extract and manually clean the printhead by proposing its latch. Moist the rough cloth with the lukewarm distilled water and clean out the excess ink on the printhead. Do not lift or touch the nozzle section. Assure that printhead should not open to excess water.
- Immediately put the printhead upside below in the glass container in a way that the nozzle headrest on the wet paper napkins. Make it remain soaked for 10 minutes.
- Its time to take out the printhead from the container and dry it with paper napkins for 15 minutes.
- After that reinstall it with all the cartridges as they were.
- After installation, shut the printer door and turn ON the printer to examine its functionality.
Fix-3 Automated Printhead Cleaning Process
Yes, you perform an Automated Printhead Cleaning process while HP printer alignment unsuccessful errors occur.
- First, place the plain white paper on the input tray.
- Soon, on the printer control panel, you require to navigate and press the setup button.
- Access Setup Menu, then choose the tools option, as it will present all the possible options in the Tools section.
- Promptly you require to take the clean printhead option and then press OK.
- The in-built tools inside the printer will function to clean the printhead.
- Lastly, test the printer by printing a blank page if the problem persists, then try the method two more times.
Fix-4 Use Genuine Ink Cartridges to Fix HP Printer Alignment Failed Issue
HP recommends using original HP ink or toner supplies for the printer. Because it includes the guarantee and reliability of the goods. Using non-HP or refilled cartridges may result in an HP Officejet Pro 8500, 8500a plus, 6500a plus, 8600 printer alignment failed or unsuccessful message. You can verify the authenticity of the ink cartridge by scanning the QR code on the toner/ink cartridge case.
Read More:
How to fix HP Envy 5540 attention required
HP Officejet Pro 9025 all-in-one printer troubleshooting
How can I connect hp printer to new wifi network
What is HP fuser error 50.2 mean
HP Envy 4510-4512 e-all-in-one printer troubleshooting
How to do HP Officejet Pro 9020 printer wifi setup
